

PVC Trip Mine "Build-it-Yourself"
WARNING: No Liability Is Assumed By The Developers Of This Website and All Literature Is Provided Second Hand, Use It At Your Own Risk!
- Build PVC Trip Mines, FREE PLANS
Feeling the pressure?
PVC Pressure Trip Mine Plans, Method 1
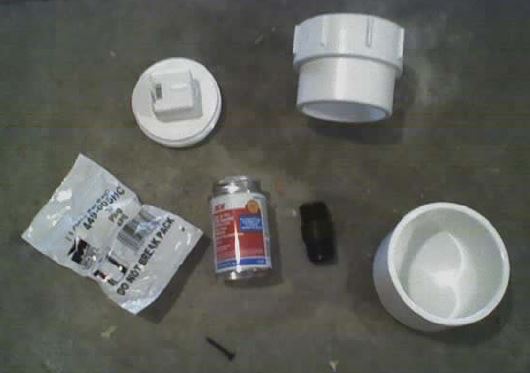
Materials needed (available at a hardware store):
- 2½" PVC end cap (this is the lower base of the mine)
- 1 2½" PVC threaded adapter (this is the middle of the mine)
- 1 2½" PVC cap (this will be the top)
- 1 ½" reducer bushing (think that is what it is called, just no hole in the middle)
- 1 ¾" wide 2" long PVC irrigation connector
- 1 threaded screw
- PVC cement
Directions:
-
 Put
a lot of PVC cement on the threaded adapter and push it into the end cap
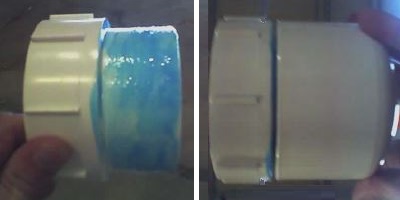
Put
a lot of PVC cement on the threaded adapter and push it into the end cap - It should push pretty far in then get stuck, use a mallet and a piece of wood to hammer it farther into place.
- You want the two as close together (sealed) as possible, set that aside and let it dry.
-
 Grab
your irrigation connector (should be about 1 1/2" long, cut to that if needed)
Grab
your irrigation connector (should be about 1 1/2" long, cut to that if needed) - Take your drill or Dremel and put a bunch of small holes about a 1/4" from one end. Make a lot of holes but not enough for it to collapse. This "tube" will be your CO2 loading tube, the holes will allow the air to release once the CO2 is "triggered"
- In the picture above, I used the top of a lid from a small prescription bottle as the mounting surface for the tube. This makes the base stable and its easier to connect to the inside of the end cap. Use hot glue to connect this cap to the tube and also to the inside (dead center) of the PVC end cap.
-
 Next
you will want to create your cap. Drill a 3/4 inch hole in the very top of the end cap.
This is where your "trigger" will be, you will need to widen it a bit later with a Dremel
to fit the reducer bushing.
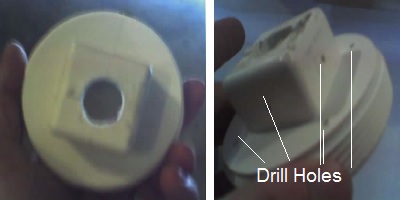
Next
you will want to create your cap. Drill a 3/4 inch hole in the very top of the end cap.
This is where your "trigger" will be, you will need to widen it a bit later with a Dremel
to fit the reducer bushing. - Now create the holes for your paint to come out of the cap. Pretty much you can use anywhere from 4 to 8 holes...your choice. As you can see I have 8.
-
 By
now the PVC cement should be dry on your "base" unit. Turn it over and drill a threaded
screw into the bottom of the base. This is your "firing pin" which will puncture the
CO2 canister. Test the depth and position of your firing pin with an EMPTY 12g CO2 (set
it on the firing pin and screw the cap on. Look through the hole - the top of the CO2
should be about 1/4" from the top. Once you have found the correct location, cut the
bottom of the screw off. Time to paint >>
By
now the PVC cement should be dry on your "base" unit. Turn it over and drill a threaded
screw into the bottom of the base. This is your "firing pin" which will puncture the
CO2 canister. Test the depth and position of your firing pin with an EMPTY 12g CO2 (set
it on the firing pin and screw the cap on. Look through the hole - the top of the CO2
should be about 1/4" from the top. Once you have found the correct location, cut the
bottom of the screw off. Time to paint >> - I would now recommend painting the body of your mine. Have fun and be original!
-
 Next
and most important, you must fit the reducer bushing into the hole you drilled. Slowly
expand the hole until the bushing fits, without much space around it. I would recommend
using a bushing that has a bottom like this >>
Next
and most important, you must fit the reducer bushing into the hole you drilled. Slowly
expand the hole until the bushing fits, without much space around it. I would recommend
using a bushing that has a bottom like this >> - This will create a safety once the mine is triggered to ensure that ONLY paint/water escapes this mine. If you do not use a bushing like this, once the mine is triggered, the force of the expending CO2 will shove the "trigger" and the CO2 canister about 45' into the air at a VERY fast rate. I know this from experience, I tested it. Do not be stupid, use a cap like this and be safe.
-
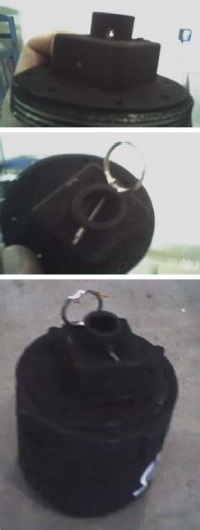 Last
but not least, you can add a pull pin to your mine. This will allow you to safely transport,
plant and "arm" your mine. Please see the pics below for the pull pin and the finished
project.
Last
but not least, you can add a pull pin to your mine. This will allow you to safely transport,
plant and "arm" your mine. Please see the pics below for the pull pin and the finished
project.
AirCannonPlans.Com
I have used and played with these mines about 30 times now. It is very fun, and I have also yet to find a field or scenario producer that will not let me use them once I have explained how it works and the safety features built in.